Saddle Position forward or Back – Correct Height For Bike Seat and Handlebar
Page Contents
Bike position, especially setting up your saddle position forward or back plays a vital role in your performance on a bike. Setting the correct height for your bike seat and handlebars will allow increased performance on the bike, but also a more comfortable ride too.
In this article we look at the basics of setting up the optimal knee angle. Paired with the correct saddle height to help you make riding more enjoyable experience.

Correct Height For Bike Seat and Handlebars
If you are fighting knee pain, back pain, or struggling to produce the power, you may need to adjust your saddle or handlebar height.
It may all seem too easy, raise your saddle and go, but unfortunately, there is more to it than that. The correct height for your bike seat and handlebars relies on your ability to produce power while keeping a stable torso and pelvis. Meaning, there is no one size fits all methodology to setting seat height and handlebar height. For example, calculations such as the Lemond method often only work for a few people. It doesn’t take into account a person’s flexibility or torsional stability.
Setting the correct saddle height is the primary factor when it comes to being comfortable on the bike. The correct saddle height will enable you to not only ride longer but also help to prevent injuries.
Having the saddle too low often results in compression injuries and having it too high can cause over-stretching and loss of stability. Both outcomes resulting in knee, hips, and lower back issues.
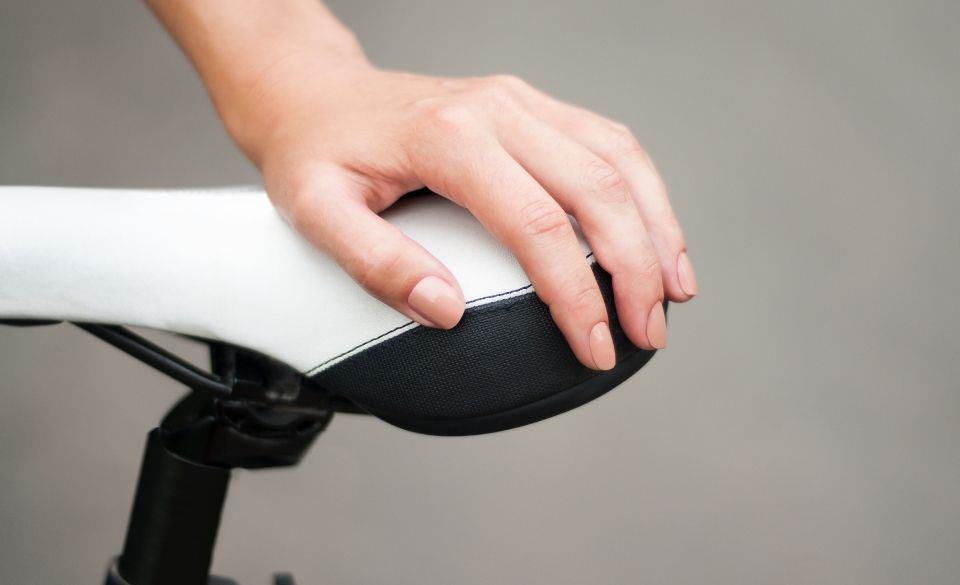
Setting The Correct Saddle Height
To measure your saddle height, measure the distance between the center top of the saddle and the center of the bottom bracket.
To set your saddle height, position yourself on the bike, unclip and position the crank in line with the seat tube. Then take your heel and position it on the pedal. Your leg should be completely straight without the need to over stretch or drop the hip to reach the pedal. This should place your knee at an angle of 25 to 35 degrees, which will help to avoid knee issues in the future. At this height, if your hips are rocking, lower the saddle by a few millimeters and re-test.

Setting The Correct Handlebar Height
Once you have set up the correct height for your bike seat, the next step is to set the handlebar height. The height should be set at a level that allows you to ride in the drops for long periods, without back or neck pain.
The height of the handlebars relies mostly on the flexibility of your lower back and hip flexors. This means the more flexible you are, the lower you will be able to set the handlebars.
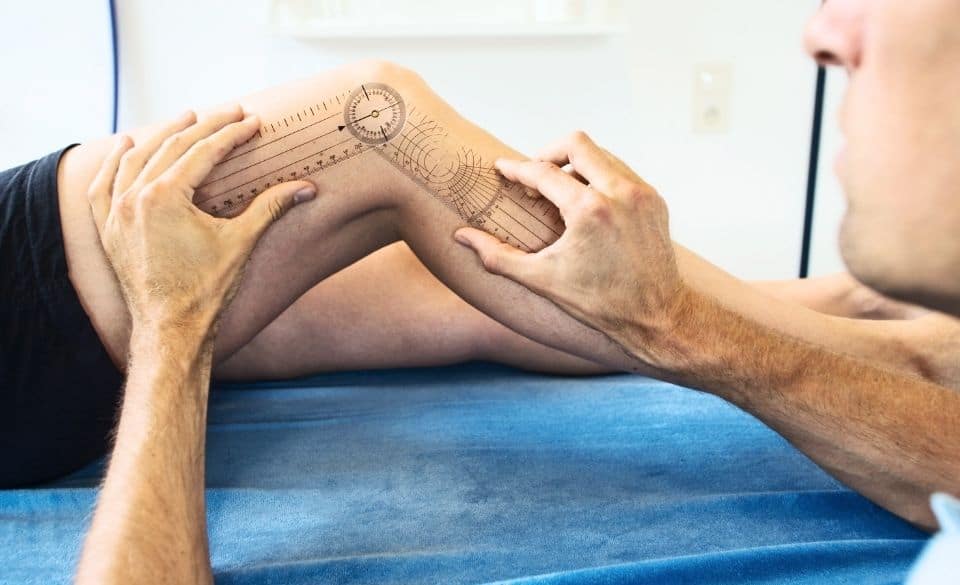
A comfortable position will usually end up with the torso and upper arm around 90 degrees. You can check this by using a goniometer, but if you don’t have access to one, holding a book can work as well. (measuring from the 90-degree corner)
If you are a competitive cyclist you are most likely going to have a more aggressive angle. The saddle to handlebar drop will then start to exceed 5+ centimeters. But it is still important to remember to keep a stable pelvis and torso under load. So if you find you are losing stability under load, your position may be too aggressive for your structural ability.
Saddle Position Forward or Back – Getting Started
Setting the correct height for the bike seat and handlebars is just the first step in your bike position. The saddle position forward or back plays a large role in weight distribution and muscle engagement.
To find your current saddle position, drop a plumb line from the tip of the saddle. Then measure the center of the bottom bracket to the plumb line, this measurement then gives you your saddle fore aft.
To find your optimal saddle position forward or back check the amount of weight balanced on the hands. A simple test you can do on a trainer is to try release the hands from the drops while pedaling. If you find you fall forward within a few seconds, there is too much weight located on the front of the bike. On the other hand, if you can hold that position for more than 20 seconds, you have too much weight located on the saddle.
This test is to find the tether of balance, a point where you can hold yourself (without falling) for around 7-10 seconds. Doing so gives us a good indication of where your balance is on the bike.
Even though this is a simple test, it often works the best. You have other methods such as KOPS (knee over pedal spindle) but this often loads the hands too much.
Once you have set up your saddle position either forward or back, you should be enlisting all three muscle groups. This means the quadriceps, hamstrings and gluteals should work in harmony together. You should not find that you are overloading one specific muscle group over another.
25 Degree Knee Angle Cycling – What You Should Know?
There has been a lot of debate about setting up your saddle position so that you have a 25 degree knee angle when cycling. This may work for some but more often than not it is much too aggressive for most cyclists based on their flexibility.
The ideal starting position for a road rider is in the ball park of 25 to 35 degrees flexion.
One study showed that a 25 degrees knee angle produced a higher mean power that the other participants in those ranges. But this study did not take into account pelvic and torsional stability when under load.
For this reason it is recommended that the knee angle should be set between 25 and 35 degrees. Then fine-tuned based on the rider’s ability to stay stable on the saddle. Often you will find that your knee angle will end up closer to 30 degrees than 25.
Optimal Knee Angle Cycling
The optimal knee angle relies on the rider’s ability to control the movement of the pelvis. Under load the pelvis should be stable and the lower back should not drop on either side of the pedal stroke.
Your hamstring and hip flexor flexibility will play a major role in your optimal knee angle. If you set up a knee angle that is slightly too aggressive your back will start to bear the load. This often gives symptoms of lower back pain and can be often located on the opposite side to that of your shortest leg.